Overview
Thank you for purchasing Strategy.
Below you will find all of the documentation needed to customize your new template/theme. I have seperated this document into categories for your ease of use. You can use the top navigation to jump to any desired area. You can find my contact information above if you have any questions or comments regarding your template/theme. Thank you again!
HTML Structure - top
Strategy is a fixed layout theme. Each page contains contains a top menu, header, main content, and footer section.

The top menu and header sections are contained in their own separate html file called "header.html".
The footer section is contained in the file "footer.html".
Each page then uses a php server-side include call to include the html files. This allows you to update these sections only once for all of the pages.
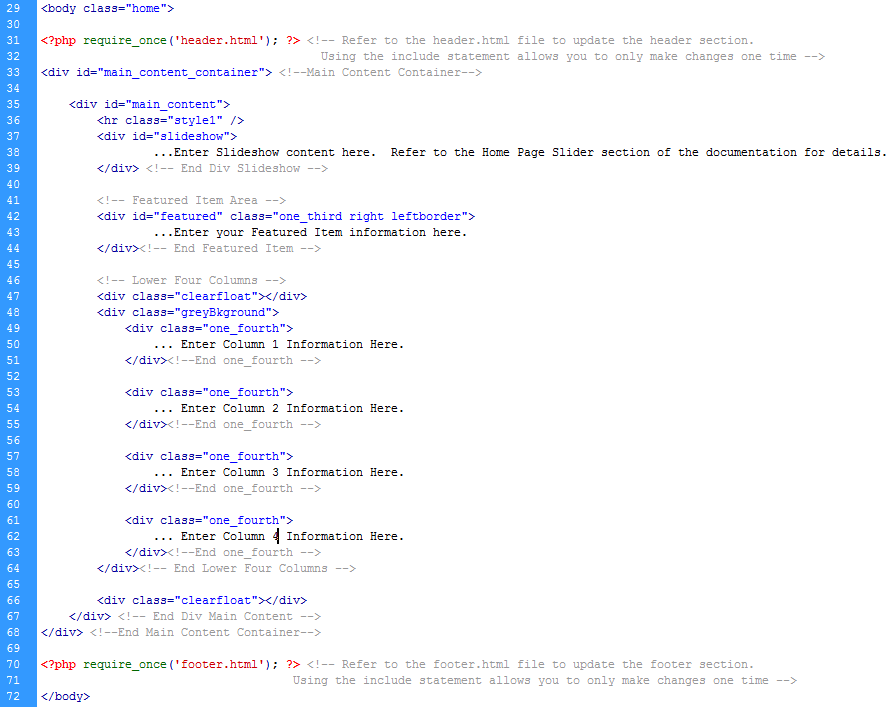
Within the main_content section of the Home pages with sliders, we have included a Slideshow area, Featured Item area, and Lower Columns area. You can view an example of this structure below. Of course this area can be changed to meet your needs. For example, you can change from four lower columns to three simply by changing the div class from one_fourth to one_third.
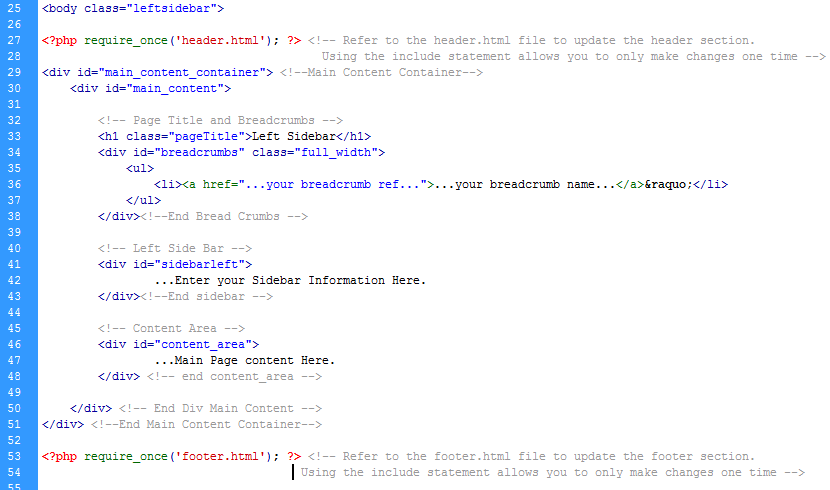
Our Interior Page layouts have the additional sections of Page Title and Breadcrumbs, Sidebar, and Content Area. Sidebars can be a "leftsidebar" or a "rightsidebar". On pages with sidebars, the Content Area contains the main content of the page. For pages with sidebar menus, you simply add a ul with class="leftmenu" or class="rightmenu" to the sidebar section. You may refer to lefmenu.php or rightmenu.php in the theme for a specific example.
CSS Files and Structure - top
Strategy uses the following two css files: ststyle.css and color.css. The ststyle.css contains all of the basic styles for the theme including css reset and all plugin element stylings. The ststyle.css includes a beginning commented table of contents area identifying each section of the file to make it very easy to find the elements you are looking for. We have included an extensive class system within the css to make manipulating your html pages very easy. For specific examples, refer to the typography.php file.
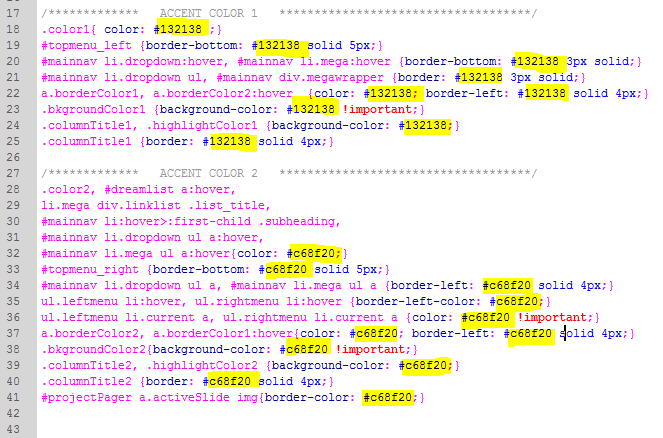
The color.css file contains all of the elements that are assigned Strategy's accent colors. To change the colors, simply replace the hex code values with your new colors. For a more detailed explanation, refer to the Changing Accent Colors section of this document.
Common Tasks - top
a) Changing Accent Colors - top
Strategy is a minimilist design that uses two accent colors. Changing the colors to match your logo and photography is very easy. Simply open the color.css file, and replace all of the color hex code values with your new colors.
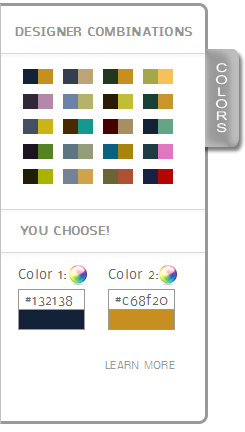
To experiment with new colors, go to the livepreview version of Strategy. Here you can use our color panel to either select one of our designer color combinations or use the color picker to select your own. We have included a cookie plugin to save your color choices so that you can play with your new colors throughout the entire site.
When you have found the colors you like, simply record the hex codes displayed in the Color 1 and Color 2 areas of the color panel and use those hex codes to replace the existing colors in the color.css file.
b) Assigning Accent Colors - top
Assigning the accent colors to elements is easy. We have created the classes of .color1 (for accent color 1) and .color2 (for accent color 2) to assign those colors to text. For example, if you wanted an h2 heading to be accent color 2 you would simply give it that class like so: 
Use the classes of .bkgroundColor1 and .bkgroundColor2 to assign the accent colors as background colors. For example, if you would like a square dropcap with the background of accent color one, you would use the following classes: 
c) Replacing Logo - top
The logo image is located at the end of the header.html file. Simply replace our logo file "strategylogo.png" with your own and place the logo image in the /images subdirectory. This area is defined as "one_third" or 300px wide. Our logo is 230px wide by 80px tall. Your logo can have any dimensions less than 300px wide.
The logo is floated to the right. If you need to adjust margins or paddings to center your logo, refer to to the #logo and #logo img css style definitions in the A. GENERAL LAYOUT, 4.Header section of the ststyle.css file.

d) Changing Contact Email Address - top
We have included the iPhorm PHP/Ajax Contact Form with the Strategy theme. To update the email address or addresses to where contacts will be sent, simply open the /contact-form/config.php file and replace the email addresses in the receipients array as shown below:

JavaScript and Embeds - top
Every page in the Strategy Theme imports the following javascript files:
- jQuery (js/jquery-1.6.1.min.js)
- jQuery UI (js/jquery-ui-1.8.15.custom.min.js) — Includes tab and accordion functionality
- Strategy's Custom Javascript (js/strategy.js) — Includes menu, testimonial rotator, and twitter functionality
The remaining two javascript files included with Strategy are included where the functionality is used:
- Aweslider (js/aweslider2.js) — Included on the Home pages with sliders
- prettyPhoto Lightbox (js/jquery.prettyPhoto.js) — Included on Portfolio pages and anywhere the lightbox is used
For changing specific functionality, please refer to the sections below.
a) Home Page Slider - top
We have included a custom coded slider for the home pages of Strategy called the Aweslider. It is a plugin which uses a horizontal circular carousel as a pager for a description div and an image div. Thumbnail images can be generated automatically or you can provide your own pager ul.
The description div (identified with the .slidecontent class) can transition at a different speed and with a different cycle animation than the image div (identified with the .slideimg class). Other features include autoplay, autopause when hovering over any part of the slideshow div, and a pause and play button. The plugin requires the following html structure and classes:

The Aweslider plugin and the initialization calls for the plugin are include in the js/aweslider2.js file. This is the initialization call for the default home page:

This is the initialization call for the Thumbnail Home page layout:

As you can see from the initialization calls above, there are many options to customize your home page slideshow. You may change the size of the thumbnails generated by changing the thumbHeight and thumbWidth. You may also change the transition effects and transition speed for the image div and the description div. The Aweslider plugin uses the jQuery Cycle plugin for the animation effects which is included in the strategy.js file. For animation options, please refer to: Cycle Effects. Thanks to Malsup for this wonderful utility!
b) Mega Menu and Dropdowns - top
Strategy's main navigation includes the option of using a drop down menu or a mega menu. The javascript for these custom coded effects is included in the js/strategy.js file. Drop down menu items are identified with the class of "dropdown". Mega Menu items are identified with the class of "mega".
Our Mega Menu is uniquely programmed to make it extremely easy to customize. It uses the div classes of .promoarea and .linklist as "building blocks" that you can order and size. The plugin determines the overall size of the mega menu based on these building blocks and then positions it correctly. You may also create multiple rows in the mega menu. This may help you visualize the "building blocks":
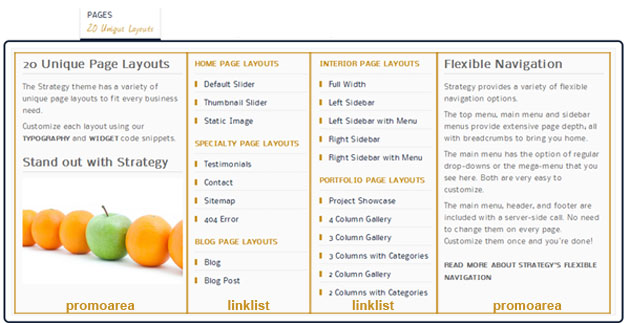
The html structure required for the dropdown and mega menu is as follow:
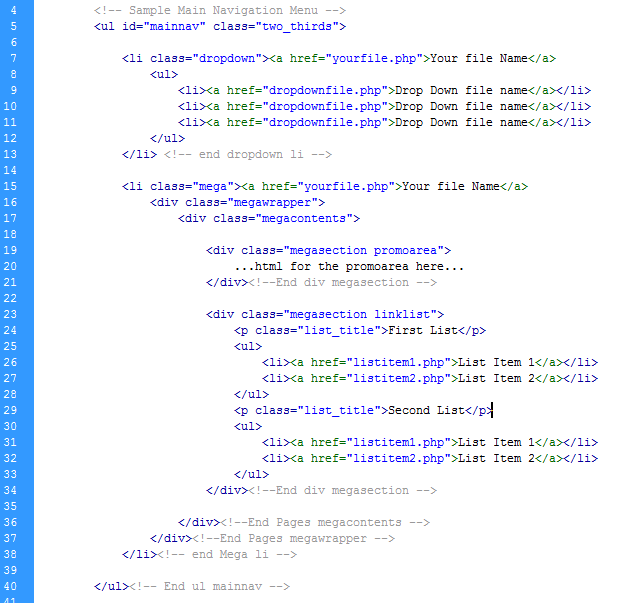
If you want to include multiple rows in the Mega Menu, the html would look like this:

To change the width of the Mega Menu Promoarea or Linklist, refer to the .promoarea and .linklist classes in the ststyle.css file under the C. NAVIGATION, 2. Main Menu section.
c) Testimonial (Content) Rotator - top
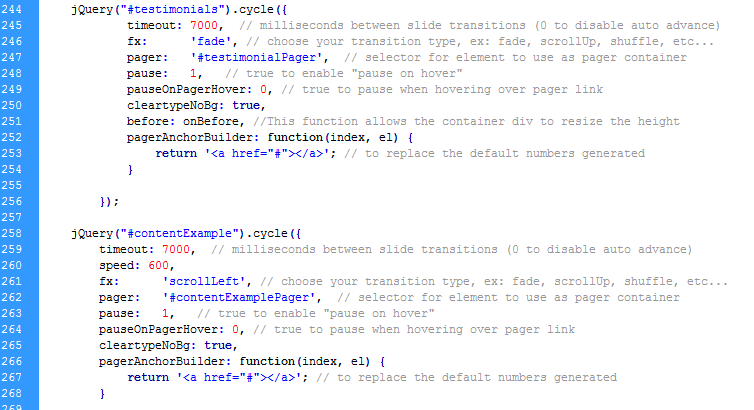
Again we rely on the jQuery Cycle plugin for our Testimonial or Content Rotator which we have included in the js/strategy.js file. This plugin can be used really to cycle through any content. Our theme has included two examples on the widgets.php page and others throughout the theme.
The first example is cycling through blockquotes which can easily be used to create a testimonial rotator. The second example is cycling through divs which contain an image, text, and links. To create the cycle effect on any section of content, simply add a jQuery initialization call to that section in the js/strategy.js file. Below are the initialization calls for our two examples:
d) Tabs - top
We have included the jQuery UI javascript file (js/jquery-ui-1.8.15.custom.min.js) for our tab functionality.
To create the tab effect, simply include the following html structure:
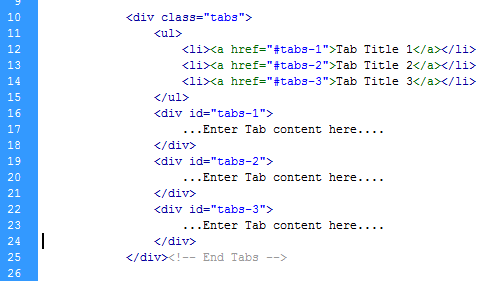
The initialization call to create the tabs effect is in the js/strategy.js file and looks like this:

e) Accordion - top
Again, we use the jQuery UI javascript file (js/jquery-ui-1.8.15.custom.min.js) for our accordion functionality.
We have included two classes for the accordion. The first is .accordionOpen which leaves the first pane of the accordion open upon page load. The second is .accordionClosed which leaves all of the accordion panes closed upon page load. To create the accordion effect, simply include the following html structure:
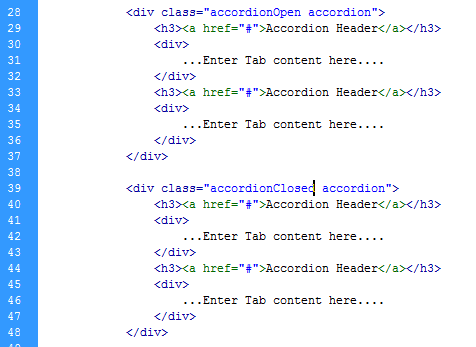
The initialization calls to create the accordion effect is in the js/strategy.js file and look like this:

f) prettyPhoto Lightbox - top
We have included the prettyPhoto plugin for our lightbox functionality. If you are assigning the lightbox to images on your page, make sure the js/jquery.prettyPhoto.js is linked in the header section. We have included it on all of our portfolio pages and widget page that use the functionality.
To assign the lightbox to an image, simply include an anchor tag with a class of "lightbox" the rel value of "prettyPhoto". The anchor tag href value will point to the full size version of your image and will wrap an img tag with the thumbnail version. To assign photos to "galleries", simply add [galleryname] to the rel value like so: rel="prettyPhoto[galleryname]". The .lightbox class is used to create the image hover effect. Here is what the anchor definition would look like:

We chose to include the css for the prettyPhoto light box directly in our ststyle.css file so there would not be confusion as to where to look for styles. We selected the "default" theme for the lightbox, however, we included the css for the other lightbox styles as well in case you would like to change it. You can find the style settings under the F. WIDGETS/PLUG-INS, 4. prettyPhoto Light Box section of the ststyle.css file.
g) Twitter - top
We have included a Twitter feed plugin in our js/strategy.js file. The only html required is a div with the id="tweets". But, you will want to style the feed a bit. Here is an example:

To initialize the feed, you also need to include the following call on the page. The best place to add it is, at the end before your closing /body tag. Refer to our widgets.php file for an example. To change the feed to your own account, simply replace "mojo_themes" with your twitter account name. You may also change the number of tweets that are displayed by changing the count number.

h) Video - top
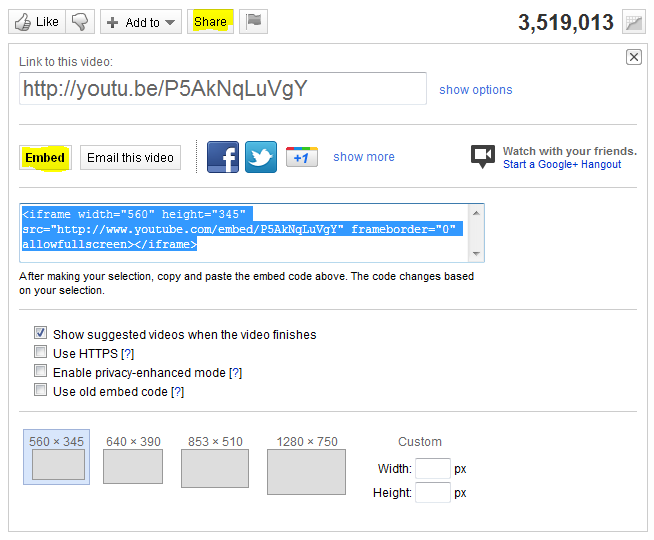
The most popular video sites have made it extremely easy to embed videos on your own blog or site. For youtube.com, below your video of choice, you should see a "share" option. After selecting "share", you should see an "embed" option. Selecting that should give you what you see below. Simply cut and paste the embed code into the page where you want the video displayed.
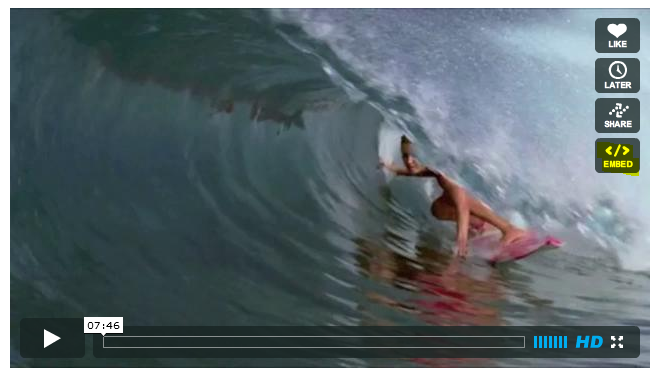
Vimeo.com makes it a little easier to see. On your video of choice, you should see an embed option. Simply select and again, cut and paste the embed code into the page where you want the video displayed.
i) Google Maps and Charts - top
Google Charts and Google Maps provide a quick, easy, and visually appealing way to display data and maps on your website.
To create a google chart, simply head to the Google Chart Wizard. After you have created a chart to your liking, cut and paste the generated img tag.
We are all familiar with Google Maps. Customizing and embedding them into your site is extremely easy. For step-by-step instructions, refer to Google Maps.
PHP/AJAX - Contact Form - top
We have included the iPhorm PHP/Ajax Contact Form with the Strategy theme. To update the email address or addresses to where contacts will be sent, refer to the Changing Contact Email Address section of this document.
The documentation for this plugin is extensive and can be found here.
We chose to include the css for the contact form directly in our ststyle.css file so there would not be confusion as to where to look for styles. We selected the "in-line" theme for the form. You can find the style setting under the D. PAGE SPECIFIC STYLES, 11. Contact section of the ststyle.css file.
PSD Files - top
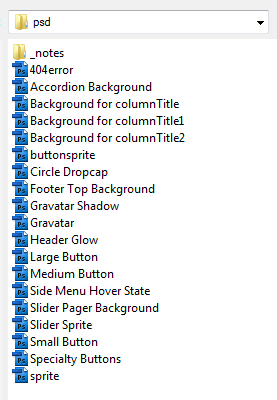
The PSD files used to create all of the design elements included with Strategy are included in the /psd directory with the theme.
They include the following:
Sources and Credits - top
We would like to give thanks to the following:
- jQuery Cycle
- iPhorm PHP/Ajax Contact Form
- prettyPhoto Light Box
- http://www.fontsquirrel.com/fonts/Nobile
- http://www.fontsquirrel.com/fonts/Journal
- http://icons.mysitemyway.com/matte-white-square-icons-media/
- http://icons.mysitemyway.com/black-white-pearls-icons-social-media-logos/
- http://webtreats.mysitemyway.com/clear-jelly-text-effect-layer-styles/
- http://commons.wikimedia.org/wiki/Crystal_Clear
- http://psdgraphics.com/icons/psd-color-wheel-icon/
- http://www.thewebdesignblog.co.uk/downloads/free-twitter-bird-speech-bubbles/
The photography on the live preview version of our site is not licensed for distribution.
We thought some of you may love it as much as we did, however, so we wanted to let you know where to find it.
- http://www.dreamstime.com/3d-render-modern-interior-of-office-image4869585
- http://www.dreamstime.com/3d-render-modern-interior-of-office-image4869943
- http://www.dreamstime.com/3d-render-modern-interior-of-office-image4899594
- http://www.dreamstime.com/3d-render-modern-interior-of-living-room-image6749670
- http://www.dreamstime.com/3d-render-modern-interior-of-living-room-image6760431
- http://www.dreamstime.com/3d-render-modern-interior-of-living-room-image10314848
- http://www.dreamstime.com/3d-render-modern-interior-of-living-room-image10355894
- http://www.dreamstime.com/3d-render-modern-interior-of-living-room-image10646123
- http://www.dreamstime.com/3d-earth-image14319910
- http://www.dreamstime.com/maze-3d-image15005637
- http://www.dreamstime.com/3d-man-bulb-idea-image17627351
- http://www.dreamstime.com/unique-individuality-image19021888
- http://www.dreamstime.com/3d-man-lifting-puzzle-piece-image13881400
- http://www.dreamstime.com/open-door-over-white-image16128826
- http://www.dreamstime.com/chrome-3d-graph-bars-image16358083
Thank you again for your purchase and feel free to contact me with any questions regarding this template/theme.
Awestruck